Thursday, October 18, 2012

Bead Soup Necklace

For some reason Blogger hates me today and it is doing odd things with my pictures.  So you get the necklace first and the explanation after.

 I made a necklace using part of my bead soup.  I used the blue hexagon beads, 2 clear glass beads that I framed with cubic right angle weave (CRAW), and 2 of the diamond shaped beads.  I added beads from stash that actually were given to me by a lady who made wire bead flowers with them.  They are hank beads and I was concerned that they might not be regular enough to use for beading, but they did great.  The strap is St. Petersburg Chain.
Necklace made with Bead Soup
In September I got a Bead Soup from Beadlush in Charlotte, NC and Kalmbach Publishing.  I showed you a picture of my soup, but I am going to share it again. I sort of explained it when I put up the picture before. Lori Anderson wrote a book called Bead Soup.  The idea is for people to send leftover beads or beads they do not want to use or special beads they have made to another person and see what they come up with for these beads.  It started with the former idea.  For this soup, Kalmbach the publisher asked bead stores to put together a package of beads to be sent to beaders.  I have until the end of October to do something with these beads and email it to Kalmbach Publishing.  Oh look there is a Pinterest page too.
Bead Soup

Wednesday, October 3, 2012

WIP Wednesday

Work continues slowly on Elizabeth.  We have a contractor repairing some water damage at our house. I was hiding in the basement, working on Elizabeth, when I heard someone coming down the stairs.  It was the plumber who needed to get to some pipes from underneath through the drop ceiling in our basement.  Suddenly, before I knew exactly what he was planning to do, he was removing ceiling tiles very close to my stitching area.  And standing on the bar.  I was grabbing up the laptop and all its pieces parts and Elizabeth and quickly stashing them out of reach.  Luckily no damage was done except to the ceiling tile which cracked.

Elizabeth with one sleeve shaded
I will apologize for my poor shot of Elizabeth this week.  We are staying in the basement since they are going to start sanding the new sheet rock soon.  So no natural light for this picture.  I have done the blackwork pattern on both sleeves and added shading to one side. 

Wednesday, September 26, 2012

"Reproduction" Sampler

I do not do reproduction samplers.  Not my thing, never has been.  But this one tempts me.

 It is from InkCircles and can be ordered here.  The designer, Tracy Horner also has a blog where she explains what she has learned from studying the "original" sampler.  Here are the posts related to the Little Alien Schoolgirl sampler.  I will enjoy following her blog to learn more about the alien script and the end of the world as predicted by sandworms.


Little Alien Schoolgirl Sampler
I realized in reading back over this that I did not really explain what she did.  There is a whole backstory developing on the designer's blog.  About being called in to a secret government facility to see the original sampler.  It is a sci fi reproduction sampler. 

WIP Wednesday 9-26

I am mostly working on Elizabeth.  I have been doing the tent stitch background.  And I did the blackwork on the underskirt.  I have the main blackwork pattern on one sleeve.  Now I have to go back and add the shading - you can see where I have started this process just a bit.  The underskirt is done in the whole filled in pattern.  So the darkest areas of the sleeve will match the bottom pattern.

Elizabeth 9-26-2012

Saturday, September 22, 2012

Elizabeth continues

It has been a full month since I posted any progress on Elizabeth.  I have worked on it.  We have also been doing some "renovations" (read fixing water damage) on our house this month.  So for part of the month Elizabeth has been packed safely away.  Her sleeves and underskirt will have blackwork on them.  The light gray you see in the picture is folds and shadows.  In the original, it was done in two different grays, but for the SNS kits the grays were too close, so we only have one shade.

Elizabeth WIP with gray shading
Bead soup from Kalmbach Publishing

And I got this in the mail from Kalmbach Publishing and Beadlush in Charlotte.  As part of the release of the Bead Soup book, they sent out some kits of beads.  Now I need to make a necklace with it and post some pictures.  I usually work with seed beads, so I have no idea what I'm going to do with this soup.

Thursday, August 30, 2012

Kumihimo and Beadwork

I decided to play with something for the Operation Tackle That Bead Stash challenge.  Each month they post a color combo and the challenge is to use beads from your stash to make something and post a picture.  They also have a facebook page with lots and lots of eye candy.  The color combo for this month is blue and copper.  I did not have a lot of copper beads to play with and I have been wanting to try Kumihimo, so I decided to play with a paper plate and these 8 strand Kumihimo instructions.

My Kumihimo threads
 I started with one crochet cotton and Omega nylon from stash.  Lesson 1 - do not try to mix two different threads if you have no clue what you are doing.  The nylon wanted to slip and the cotton wanted to grip.  But I persevered.  Because I am stubborn like that.
Kumihimo braid

Wow I put a lot of links in that explanation.  And I am not done yet.  Another thing I wanted to play with is from a new beading book by Kate McKinnon and Jean Power.  The book is not out yet, but if you preorder the book, you can access some of the projects ahead of time.


The power puff ring as a clasp in progress
 I followed the power puff ring instructions but added the magnetic clasp at a corner. 
Finished necklace
My kids say I made myself a bow tie.

Wednesday, August 22, 2012

TAST update

 I have not done much on my Gingerbread house since I have been working on Elizabeth.  I have however made the base tree for that end of the house.  It is done in 1/4 Algerian eyelet stitches.

Tree super close up to show the eyelets
My husband says it looks like an arrowhead.  Maybe he won't be so critical when it is actually decorated.  And to be fair, I did ask his opinion. 
Tree or arrowhead?

WIP Wednesday

I am working on mostly on Elizabeth.  Not really much to report this week, but I will show you a picture of continuing on the bodice. 

Gay Ann currently has pictures on her home page of two smaller pieces that will be released as companions to Elizabeth:  Bess of Hardwick and Mary, Queen of Scots.  OK, now I will have to save up my pennies.  and $.
Elizabeth

Wednesday, August 15, 2012

Work in Progress Wednesday

Sharon on Pintangle is hosting WIP Wednesday.  The goal is for all of us to update our blogs and show what we have been doing on a large project as we work on it. 

My big project is Elizabeth from Gay Ann Rogers. To see other finished Elizabeths, click here.  I have been working on Elizabeth's bodice this week.  I have done the left side, and am ready to start the right.  A lot of the bodice will be covered with beads.

Elizabeth in progress

Thursday, August 9, 2012

Still here and working on Elizabeth

No, I really did not drop off the planet.  However, all my teen boys were home for the summer.  So while I did get some stitching time in, I did not get much computer time in.  The hair is done in French knots with tails to cover the ground.  I think my French knots are closer together than the original by Gay Ann Rogers.

Elizabeth with hair and cap late July 2012
The next thing to be added to Elizabeth were her cuffs.
Cuffs closeup
 The last picture is the overview of Elizabeth as she is now.  The top corner shows the background basketweave.  Gay Ann Rogers recommends working it a little at a time as we work on the rest of the piece.  So far I am really enjoying this project.

And an overview of Elizabeth

Wednesday, June 27, 2012

Elizabeth face

I am doing A Portrait of Elizabeth through the Shining Needle Society.  The Shining Needle Society is a Yahoo group that administrates online classes by well known teachers.  The teacher, Gay Ann Rogers, posts lessons on her website and we communicate through a Yahoo group.  You can see the finished piece and other people's work here.

My Elizabeth after Lessons 1-3

Tuesday, June 12, 2012

Be Consistent

 Joni Stevenson is an ANG Master teacher.  On her blog she has written an excellent article on stitch direction and how it can change the front of your work.  Although her examples are on canvas, it can also show up even when stitching on linen.

http://creative-stitch.blogspot.com/2012/06/be-consistent.html

Sunday, May 27, 2012

TAST finally caught up

I finally put the rest of the skipped TAST stitches in my gingerbread house.  I am still working on the girl. I know it will be hard to see, since it is hard to take pictures of white on white. 
Girl overview
 In the closeup I hope you can see that I outlined the apron in crossed buttonhole (Week 18) and then added the pink beads in the holes I left behind.  The middle part of the apron is 4 rows of wheatear (Week 17) in alternating directions.  The scallops on the edge are whipped wheel (Week 11).  All the white stitching is DMC Perle 12.
Girl skirt with new stitches

Friday, May 25, 2012

New Temari Book by Barb Suess

Temari are Japanese balls made of a core covered by thread and then decorated.   I have been making temari for years although I tend to make the same patterns over and over and give them as gifts.

I received Barb Suess' new temari book in the mail yesterday.  Barb's new book is beautiful and a great resource. Barb has put up some pages on her website.  Click here to get a peek inside the book.

There is everything a beginner would need to know to get started with temari.  There are chapters on materials, making your core, putting in guidelines, and all the basic divisions.  There are 3 different techniques for marking a C10, which can be hard to get right.  The diagrams are clear and easy to follow. There are instructions for simple and intermediate balls to make throughout the book.  And a chapter of more complex patterns to make at the end. 

If you want to try temari, this book will get you started.  If you already know how to make them, this book is a great reference.  And if you just want eye candy, this book is beautiful.  Barb's book is available to order from the author through her website by clicking on the book cover in her sidebar. 

Wednesday, May 23, 2012

Butterfly Chain

Boy and Girl in Progress
I am continuing to work on my Gingerbread Boy and Girl using TAST stitches.  I added Bullion Knot (Week 20) to the spaces between the half chevron.  It was done with one strand of the mystery floss.  It might have gone better with a slightly thicker thread, but it was a small space.  Her buttons are done with French Knots (Week 16) also with one strand of green mystery floss.  Her sleeves are done with two strands DMC 321 floss using Week 21 Butterfly stitch. 

The gingerbread parts on both are done with DMC 436 one strand.  His head is is discussed here. It is done in a pulled backstitch.  Her head is just a double running with no tension.  Any opinions?  Feel free to leave a comment if you like one better than the other. 

Girl top closeup


Monday, May 14, 2012

TAST summary page

I added a page to the blog that has links back to where I have used the various TAST stitches and talked about them in the blog. 

Now to get caught up on the rest of the stitches.

TAST update

I have not been stitching much.  But here is a quick update on what I have done on my gingerbread house.  I am still working on my boy and girl. I already had Week 14 (Satin Stitch) and Week 15 (Stem Stitch) on the boy and girl. 

Gingerbread boy and girl
 As you can see in the closeup, I couched (Week 9) down a gold beading wire to outline the girl's collar. It was couched with hand quilting thread.  I decorated the collar with detached chain(Week 7) in the metallic sewing thread I used on the boy.  I added the belt in Barred Chain (Week 12) using one strand of DMC 321.  I used Half Chevron (Week 19) for the main front of the top. 
Girl top closeup

Saturday, March 31, 2012

Not much stitching time

I have not made a post in over two weeks.  I really have not been stitching much at all.  I have worked a tiny bit  on my Gingerbread boy.  I added whipped chain on his shirt.  The green is the same mystery floss used in the belt.  It is whipped with one strand of white floss.  The belt was outlined with one strand of DMC floss 321 to make a buckle.

Whipped chain added to boy's shirt
 And I had to add at least one picture of spring in my yard.  All blogs need at least one flower picture.  I also clearly need to clean out the old leaves from last fall.

Monday, March 12, 2012

Making a beaded flower or button


This post will show how I made the buttons for my gingerbread boy. I used Nymo and a beading needle since I go through each bead 2 times.
First I added 2 beads over a 4 x 4 square of linen.

First 2 beads
 
Then I added the next 2 beads as if doing a cross stitch. I adjusted the beads before pulling the thread all the way through so that one fell on each corner.

2nd 2 beads adjusted one on each side

Next I came back up through the first bead, added the center bead, and then down through the other side of the cross.

Back up through the first bead
Adding the middle bead


Finally, repeat the other side of a traditional cross stitch passing right to left through the center bead.  When done, the four bottom beads will lay at angles and the top bead will be vertical on the top.


Pass a 2nd time through the middle bead
Finished button or flower

Sunday, March 11, 2012

Week 4 TAST finally

Week 4 TAST was the Cretan Stitch.  I decided where I wanted to use it, but I had to get there first.

I found Rose's raised Cretan stitch on her blog when looking at everyone's work.  This was not a stitch I was familiar with, so I used my trusty friend google to find instructions.  Then I stuck both of them on my TAST Pinterest page so I could find them again later.

For the boy's pants I used Perle 5 DMC 321 and Ribbon Floss 142F-12.  They are just slanted satin stitch.

For the belt I used 3 strands of mystery floss from a stash given to me by a friend some time ago.  She had gathered a lot of odds and ends and put them in a bag.  Some were orts, some were whole skeins.  And everything in between.  I did the back stitch base with the floss.  Then I added 2 strands of the metallic sewing thread (also a mystery fiber) that I used in his sleeves to do the raised Cretan. A bit of the metallic sewing thread is pinned at the bottom so you can see it.

Close up of the Raised Cretan Belt

 
Boy got pants and a belt


Bag of partly unided thread

Saturday, March 10, 2012

Using pastel chalks in needlework

Tint Your Stitch! is the title of Barbara Elmore's post on her blog Stitchpography.  She talks about stitching and then using pastel chalks in pencil form to color her stitches.  She also has a sample of her work and of Melissa Shirley's Indian Maiden using the technique. 

I don't know if I am brave enough to ever try it, but it is an interesting technique.

Friday, March 9, 2012

Working on the Gingerbread Boy

I have been working some on my gingerbread boy.  His head is done in one strand of DMC 436 using a pulled back stitch.  It has a herringbone like pattern on the back, so it is puffy in  places.

The sleeves are done in running stitch (or pattern darning) using white Perle 8 which is then woven with a metallic mix sewing thread of unknown origin. (Read this as: left over from another project with no labels)

The sun is coming from the side so it is not a great picture.

Close up of boy

Monday, March 5, 2012

Boy and Girl

I have been working on my Gingerbread boy and girl. They are both outlined in perle 8 white using outline stitch. I have picked threads, beads, and stitches for the boy. Now I just need to find time to stitch.
Options for the gingerbread boy

Outline stitch

Wednesday, February 29, 2012

Happy Leap Day

I am not sure what happened to February.  It vanished out of my life very quickly.

I am still working on my house.  Life has interfered, so I am not as far along as I wanted to be.  I also need to put in more background before I can use some of the current TAST stitches.  The plan for this end of the house is the two people and a wreath above.  Although I have not decided for sure yet, the plan is a snowman on one short end and a decorated tree on the other.

Gingerbread people placed on one large side of the house

Really behind on everything


Vicky De Angelis on her blogoversary post gave away a thread separator made by Puffin and Company. Which I won. I love reading Vicky's blog and I want to send her a big thank you for my new toy. She wrapped it up beautifully with wired ribbon which you can see in the corner.

Thread and Yarn separator

Wednesday, February 15, 2012

TAST week 7


TAST week 7 is detached chain or lazy daisy stitch. This will eventually make it into my gingerbread house, but I need to put more background in first. So I played with detached chain on my doodle cloth. I usually think of this stitch as working out from a center, so I decided to play with it backwards. All stitches are done with 2 strands DMC floss.

 First I simply worked a square with the detached chain tack stitches all going into the center hole.
Detached chain 1

Then I did a shorter tack stitch with a little pull to make a center eyelet.
Detached chain eyelet
Finally I did the 4 chains across the top of the picture and wove the side ones in to make a basket effect.
Detached chain woven

Monday, February 13, 2012

Gingerbread house update


Front of house progress
I have been working on my house. Mostly I have been doing the boring royal icing buttonhole stitches around the outside edges.

 I have basted in my widow and door on the front of the house. The window will eventually be hardanger. I have added TAST week 6 - Chevron stitch to the upper part of the house.

The big picture

Cube bead


Cube ready to assemble
I realized I have not posted here for 10 days. No I did not get lost. My husband was home sick pretty much all last week, so although I did stitch, I did not post anything.

I did make my cube bead from Bead and Button free patterns I used size 8 beads to try out the pattern.  Of course it was easier with larger pieces and bigger beads.  I plan to make a cube with the 11s I used for my triangle bead.
Completed Cube Bead

Friday, February 3, 2012

I got distracted

I love to play with lots of different kinds of needlework.  I love beads.  I have been a subscriber to Bead and Button for several years now.  I also love math and shapes.  So when Bead and Button put out this free pattern I had to try it.  Please note, you do have to be a registered user of Bead and Button to get to the free pattern. 

For those of you who have done beading in hand, you know that the most annoying part is getting started. Once you have a few rows and something to hold on to, it gets much easier to handle. These beaded beads are made in little triangles. So about the time you get enough beads to hold onto, it is time to start a new triangle.

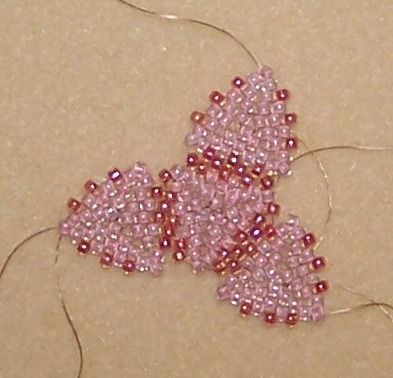
This picture shows the bead in the middle of assembly.  It is made in 4 different pieces and then they are attached.  The bead really only uses herringbone and peyote.  If you are familiar with these beading stitches and do not get too annoyed with tiny pieces, this is not a hard pattern to follow.  I would not recommend it for a beginning beader.  I would recommend finishing off the tails in all but the center triangle.  I left them because I was not sure which would be better to use for finishing the bead.  It was much harder to tie the ends in later.

The necklace shown in the whole pattern used 13 3-D triangle beads, a beaded cube, gemstone chips, pearls, and glass rondelles.  I know I will not make the necklace as shown.  I will make the cube.  I am thinking of trying it with larger beads.  The pattern calls for 11s.
Beaded triangular bead - made in 4 parts and then attached.
finished bead side view


finished bead top view