Showing posts with label beads. Show all posts

Friday, April 24, 2015

Soutache necklace finished

I finished this some time ago and never blogged about it.  I decided the focal needed an edging. First I tried with the 15 hex beads I used in the focal. The date on that picture is early February. But they were too irregular. I set the piece aside until I could come up with something I liked better. I know I wore the piece in late February.

Edging test with size 15 hex beads - ugh

I liked this edging much better

Wednesday, January 28, 2015

Soutache again

I wrote not quite a year ago about taking a class in Soutache embroidery.  I wrote then that I was not planning to try it again.  But I had some left over soutache braid and some beads to play with so I made a focal.  I was thinking of making a pin, but I may add a chain and make another necklace.


Friday, April 18, 2014

Soutache necklace

I am a member of Cyberpointers - an online ANG group.  We did an online class in Soutache embroidery with Amee Runs with Scissors.  I really enjoyed making the necklace.  Putting it together, not so much.  I am not good at the wirework parts of making jewelry.  I hate making centered loops.  I am glad I got to try this technique, but I think I will stick with seed beads.

Entire necklace

Close up of the center section

Wednesday, January 9, 2013

Bead Soup Necklace

I got a bead soup in 2012.  I showed one necklace made from it in this post.


Bead Soup

I completed a 2nd necklace, but had some camera issues and never got a picture up on the blog.  I wore this for most of Christmas.  The clasp is based on Kate McKinnon's power puff.  The bottom part is strung on gold beading wire.  The side beads are peyote.  Pretty much everything came either from the Bead Soup or from stash.  I think I bought the bicones.

Green Bead Soup Necklace

Thursday, October 18, 2012

Bead Soup Necklace

For some reason Blogger hates me today and it is doing odd things with my pictures.  So you get the necklace first and the explanation after.

 I made a necklace using part of my bead soup.  I used the blue hexagon beads, 2 clear glass beads that I framed with cubic right angle weave (CRAW), and 2 of the diamond shaped beads.  I added beads from stash that actually were given to me by a lady who made wire bead flowers with them.  They are hank beads and I was concerned that they might not be regular enough to use for beading, but they did great.  The strap is St. Petersburg Chain.
Necklace made with Bead Soup
In September I got a Bead Soup from Beadlush in Charlotte, NC and Kalmbach Publishing.  I showed you a picture of my soup, but I am going to share it again. I sort of explained it when I put up the picture before. Lori Anderson wrote a book called Bead Soup.  The idea is for people to send leftover beads or beads they do not want to use or special beads they have made to another person and see what they come up with for these beads.  It started with the former idea.  For this soup, Kalmbach the publisher asked bead stores to put together a package of beads to be sent to beaders.  I have until the end of October to do something with these beads and email it to Kalmbach Publishing.  Oh look there is a Pinterest page too.
Bead Soup

Saturday, September 22, 2012

Elizabeth continues

It has been a full month since I posted any progress on Elizabeth.  I have worked on it.  We have also been doing some "renovations" (read fixing water damage) on our house this month.  So for part of the month Elizabeth has been packed safely away.  Her sleeves and underskirt will have blackwork on them.  The light gray you see in the picture is folds and shadows.  In the original, it was done in two different grays, but for the SNS kits the grays were too close, so we only have one shade.

Elizabeth WIP with gray shading
Bead soup from Kalmbach Publishing

And I got this in the mail from Kalmbach Publishing and Beadlush in Charlotte.  As part of the release of the Bead Soup book, they sent out some kits of beads.  Now I need to make a necklace with it and post some pictures.  I usually work with seed beads, so I have no idea what I'm going to do with this soup.

Thursday, August 30, 2012

Kumihimo and Beadwork

I decided to play with something for the Operation Tackle That Bead Stash challenge.  Each month they post a color combo and the challenge is to use beads from your stash to make something and post a picture.  They also have a facebook page with lots and lots of eye candy.  The color combo for this month is blue and copper.  I did not have a lot of copper beads to play with and I have been wanting to try Kumihimo, so I decided to play with a paper plate and these 8 strand Kumihimo instructions.

My Kumihimo threads
 I started with one crochet cotton and Omega nylon from stash.  Lesson 1 - do not try to mix two different threads if you have no clue what you are doing.  The nylon wanted to slip and the cotton wanted to grip.  But I persevered.  Because I am stubborn like that.
Kumihimo braid

Wow I put a lot of links in that explanation.  And I am not done yet.  Another thing I wanted to play with is from a new beading book by Kate McKinnon and Jean Power.  The book is not out yet, but if you preorder the book, you can access some of the projects ahead of time.


The power puff ring as a clasp in progress
 I followed the power puff ring instructions but added the magnetic clasp at a corner. 
Finished necklace
My kids say I made myself a bow tie.

Monday, March 12, 2012

Making a beaded flower or button


This post will show how I made the buttons for my gingerbread boy. I used Nymo and a beading needle since I go through each bead 2 times.
First I added 2 beads over a 4 x 4 square of linen.

First 2 beads
 
Then I added the next 2 beads as if doing a cross stitch. I adjusted the beads before pulling the thread all the way through so that one fell on each corner.

2nd 2 beads adjusted one on each side

Next I came back up through the first bead, added the center bead, and then down through the other side of the cross.

Back up through the first bead
Adding the middle bead


Finally, repeat the other side of a traditional cross stitch passing right to left through the center bead.  When done, the four bottom beads will lay at angles and the top bead will be vertical on the top.


Pass a 2nd time through the middle bead
Finished button or flower

Monday, February 13, 2012

Cube bead


Cube ready to assemble
I realized I have not posted here for 10 days. No I did not get lost. My husband was home sick pretty much all last week, so although I did stitch, I did not post anything.

I did make my cube bead from Bead and Button free patterns I used size 8 beads to try out the pattern.  Of course it was easier with larger pieces and bigger beads.  I plan to make a cube with the 11s I used for my triangle bead.
Completed Cube Bead

Friday, February 3, 2012

I got distracted

I love to play with lots of different kinds of needlework.  I love beads.  I have been a subscriber to Bead and Button for several years now.  I also love math and shapes.  So when Bead and Button put out this free pattern I had to try it.  Please note, you do have to be a registered user of Bead and Button to get to the free pattern. 

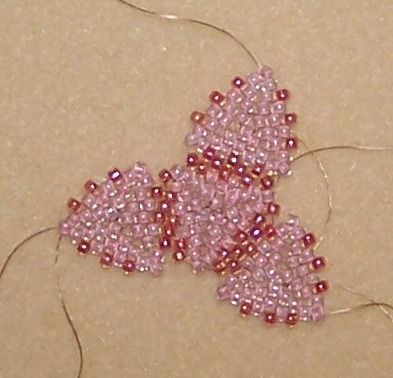
For those of you who have done beading in hand, you know that the most annoying part is getting started. Once you have a few rows and something to hold on to, it gets much easier to handle. These beaded beads are made in little triangles. So about the time you get enough beads to hold onto, it is time to start a new triangle.

This picture shows the bead in the middle of assembly.  It is made in 4 different pieces and then they are attached.  The bead really only uses herringbone and peyote.  If you are familiar with these beading stitches and do not get too annoyed with tiny pieces, this is not a hard pattern to follow.  I would not recommend it for a beginning beader.  I would recommend finishing off the tails in all but the center triangle.  I left them because I was not sure which would be better to use for finishing the bead.  It was much harder to tie the ends in later.

The necklace shown in the whole pattern used 13 3-D triangle beads, a beaded cube, gemstone chips, pearls, and glass rondelles.  I know I will not make the necklace as shown.  I will make the cube.  I am thinking of trying it with larger beads.  The pattern calls for 11s.
Beaded triangular bead - made in 4 parts and then attached.
finished bead side view


finished bead top view